Follow these instructions to create invoices:
- Go to Billing > Manage Invoices.
- Click the Add button.

 Tip: You can also quickly generate an invoice for a single matter directly from the Matter Details page by clicking the Add Invoice for Matter button.

- Select the Client. Note that if you have previously generated invoices for this client, your invoices format and layout preferences will be loaded.
- Select the Invoice Date. This is the official date of the invoice shown in the PDF.
- Select the Start Date (optional). Only billing items with dates on or after the start date will be included in the invoice. If no start date is specified, all items prior to the cutoff date will be included. Note: If you wish to generate a LEDES file, you must include a start date as it is required for this output format.
- Select the Status for the invoice.
- Pending: the invoice has not been reviewed or sent to the client.
- Submitted: the invoice has been submitted for internal approval before sending to the client.
- Approved: the invoice has been internally approved for sending to the client.
- Sent: the invoice has been sent to the client. Invoices with this status may not be changed in any way that affects the fee and expense amounts due or invoice numbering. Billing Items (except for payments) cannot be added or deleted.
- Paid: the invoice has been fully paid by the client and the outstanding balance is zero. Invoices with this status may not be changed in any way that affects the fee and expense amounts due or invoice numbering. Billing Items (except for payments) cannot be added or deleted. The status of an invoice is automatically set to "Paid" when payments received against the invoice have reduced the balance to zero.
- Write-Off: the invoice has been fully or partially written-off and the outstanding balance is zero, even though the payments may not equal the invoice amount. Invoices with this status may not be changed in any way that affects the fee and expense amounts due or invoice numbering. Billing Items (except for payments & write-offs) cannot be added or deleted. The status of an invoice is automatically set to "Write-Off" when the combination of payments received and write-offs against the invoice equal the invoice amount.
- Select the Cut-Off Date. Only billing items with dates up to and including the cut-off date are included in the invoice.
- Enter an Invoice Name or accept the unique name AppColl generates.
- Select the Payment Terms.
- Select the record that contains the Bill To information for this invoice, as well as the Remit To information or accept the defaults. If this is for your own law firm your law firm must be listed as a Law Firm in the Contacts module.
- Enter Comments (optional). This text will be added at the end of the invoice if the Amount Due section is included.
- Enter a Description. This text is not included in the invoice.

Next, review the sections of the invoice and work with options. For even further information on invoice sections than what is below, click here.
- Select and configure the sections to be included in the invoice by clicking the Include checkbox.
- For every section included, you may indicate that a page break before the section is required by clicking the New Page checkbox.
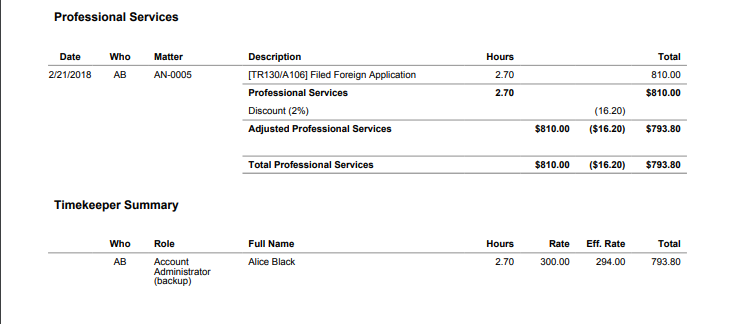
- Professional Services & Charges: If you have new items that require payment from the client, you must include this section. It may be configured as follows:
- (optional) Select the matter and/or task, for this invoice. Only billing items corresponding to the selected matter and/or task, will be included in the invoice.
- If necessary, change the Invoice Number. AppColl automatically generates the next available invoice number when you create the invoice. You can put text in the invoice number at the start if desired – e.g. 000066
- Select the grouping for the invoice. You can generate invoices with charges related to matters or tasks grouped together.
- If desired when grouping billing items, select the Invoice number per group checkbox to generate a separate invoice number for every group.
- Select the information you want included in the invoice for fee adjustments, individual timekeepers, client reference numbers, and foreign associate reference numbers.

16. Matter Fees & Expenses Summary. This section allows you to provide a total of all fees and expenses that have been invoiced for this matter.


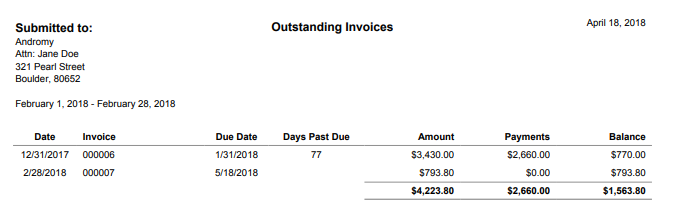
17. Outstanding Invoices. Selecting this section allows you to show any past due amounts, in addition to the current invoiced amounts, for the client.

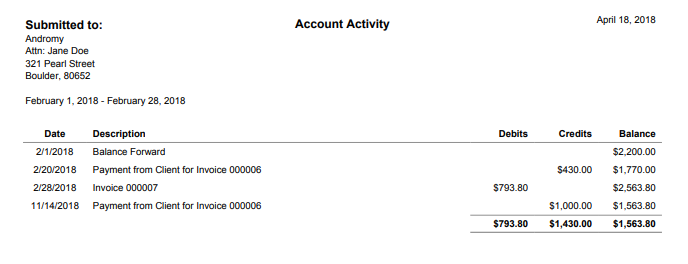
18. Account Activity. This section shows all invoiced and paid amounts for the client.

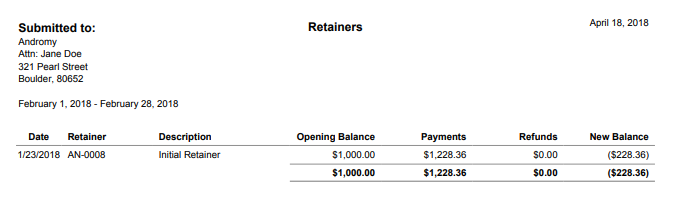
19. Retainers. This section shows all credits and debits to retainers for the client.

20. Amount Due. Use this section to provide the total amount due for the entire invoice, as well as the subtotals of the invoices different sections. You can also select the "Past Due Notice" for invoices that are past due.
Finally, if your client pays through wire, you can include your wire instructions in this section. In addition to selecting the "Wire instructions" checkbox, you must add this information to your firm's Contact record in the Contacts module.


- Click the Apply Changes button to generate a preview invoice for review. Note that the "Remit To" information will not be shown to save space. You may change an item in the invoice by clicking on the line for that item in the invoice in the preview section. You may add new items to the invoice by clicking on the Add billing Item button.
- Notice there is a preview of the invoice in a PDF format. Click on the date to view the PDF file.
- Click on the Save button to save changes and return to the list of invoices.
