Please Note: This feature is only available in AppColl Plus. Click here for pricing and details on the plus features.
AppColl provides a mechanism by which users can send/forward emails into AppColl. AppColl converts the email to an .eml file and stores it in the appropriate location based on the email address, as shown in the table below. Specifically, emails can be stored directly to a matter folder, client folder, or a root (global) email folder. When sending an email to a specific matter or client, an "email" sub-folder is created for the matter or client.

Matter Email Intake Folder and Address Location
A matter’s Email Intake address can be easily found by going into the matter details page and looking on the left side of the screen near the “Related Matters” section. Either link can be clicked to open an email (based on your default mail client) with the address in the recipient (“To”) field, or the text can be manually copied.

As you can see, there are two intake addresses. The top one is based on the MatterID. The bottom one is based on the AttorneyRef. Note: You can use either one.
For example, if the MatterID for a given matter is 1737, the email address for the matter would be “denip1m1737@intake.appcoll.com.” If the AttorneyRef for the same matter is LOC-001-00, the email address would be “denip1LOC-001-00@intake.appcoll.com”
Client Email Intake Folder and Address
To store an email in a specific client contact's folder, we use the following email address format: “<IntakeID>c<ContactID>@intake.appcoll.com”.
The email address for a client is located on the left side of the screen of the contact details page for a client.
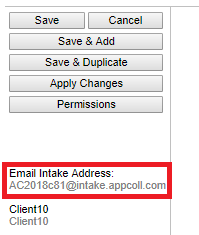
The number shown after the 'c' in the email address corresponds to the ContactID value. As such, you do not need to open the client contact record to determine the intake email address associated with it. You can simply include the ContactID column in the Contacts Module to see the ID for all your client contacts.
For example, if the ClientID for a given client is 772, the email address for the matter would be “ac2018c772@intake.appcoll.com.” The below image shows an example of the “Email” sub-folder that will be created inside of a client’s folder to store received emails that are sent to a client contact's Email Intake address.

Global Email Intake Folder and Address
Finally, there is an Email Intake Folder in the account’s root (Top) folder. The format for the Global Intake Email address is “<IntakeID>g@intake.appcoll.com”. For our example account, the address would be “AC2018g@intake.appcoll.com”. The below image shows an example of the “Email” folder that will be created inside of the “Top” folder to store received emails that are sent to the global Email Intake address.

Working with Received Emails
Review correspondence from the Matter Details page by clicking the Conversations tab.

Click the Add button in the Notes column to add notes to any email you wish. Notes will be stored for everyone to see. Subsequent notes can be added at any time and by anyone.

Any attachments within an email are broken out as separate files and stored in the same "Email" folder as the .eml file. You can locate this folder from the Files module by selecting the Client folder and opening the associated Matter folder fro the emails. There are no limits on the number of attachments. However, the size of all the attachments cannot exceed 10MB. The name of each attachment starts with: 1) Date and time the email was received in UTC format; 2) The email address of the sender; 3) The subject line of the email; 4) The name of each file. Each file will also have the same date and time in the Modified column. This allows for easy identification of which files are part of the same email.

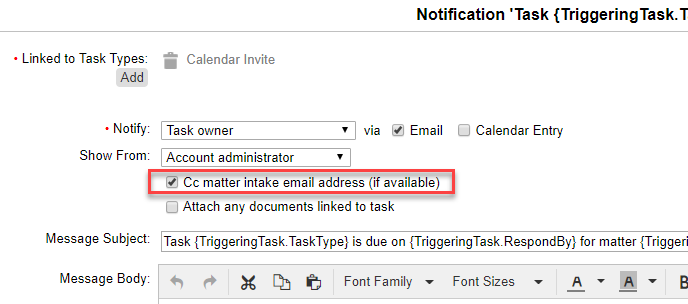
Automatically Send Task Notifications to Intake Folder
Email notifications that are automatically sent when a task is created or updated can also be cc'd into the email intake folder for the matter. For example, the "Receive Non-Final Office Action" task type may have a notification associated with it whereby an email is sent to the matter attorney when the task is created. This email can also be cc'd into the matter's Email folder by checking the below checkbox.
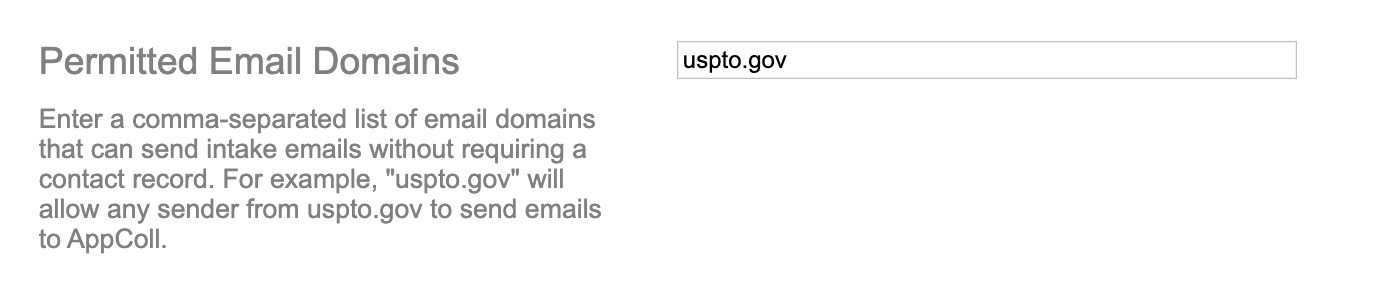
Permitted Domains
Normally AppColl will only accept emails from senders who have contacts in your account. If you wish to receive all emails from a trusted domain, regardless of the specific email address, enter the domain to the Email Permitted Domains list located on the Settings page. This is useful to automatically accept all emails from organizations like the USPTO.
Auto-create Contacts
When using the AppColl interface to send emails, (not your local email client) any email address in the To, CC, or BCC line that isn't a contact will automatically be added to your account. This means that if they reply to the email it will be automatically accepted by AppColl.
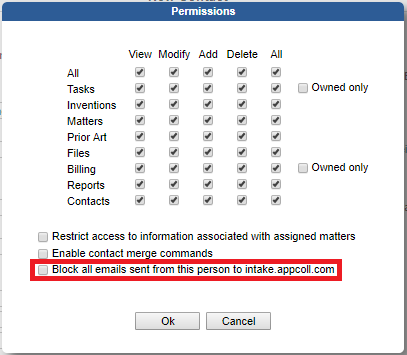
Permissions
AppColl also provides a permissions setting to block certain email addresses from sending email into your account. Clicking the Permissions button in any contact details page opens the the “Permissions” popup shown below. If the checkbox labeled “Block all emails sent from this person to intake.appcoll.com” is checked, then any emails sent from that contact’s address will not be stored in AppColl. Please note: By default, anyone with an email address stored in a contact record in AppColl can send emails into the account.