AppColl's Time Manager simplifies the entry and updating of billing items associated with a person's time. The Time Manager, available on any page in AppColl, is used to start/pause/stop billing timers and to quickly enter and edit “Fee” type billing items for the person currently logged in. This article shows how to create a basic timer, work with timers you've already created, and manage fee billing items. It also explains uninvoiced, invoiced, total and cap amounts, as well as how to round up billing timers.
Create a Basic Timer
- Hover over the Time Manager icon and select Start New Timer.

 Tip: You can also start a timer from a Matter or Tasks list by clicking on the Timer icon next to the corresponding row. This will show a form with information pre-populated from the row to speed up creation of the timer or billing item.

- The Start New Timer window will open. At a minimum, you must select a Client for the timer.
- Enter additional information, such as the Matter, as desired. The Hourly Rate field will automatically be filled in with information from your contact record. If you have different rates for different clients this field will change as you switch clients.
- Click the Start Timer button.

The clock will start ticking, and you will be able to view the time accumulated. Note: Only one timer can be run at a time.

Work with Timers
- To view a timer, hover over the Time Manager icon.
- All active (running and paused) timers will show. This window will disappear if your mouse leaves the pop-up window. A green highlighted row indicates a timer is running. To start or pause an existing timer, Hover over the row. Depending on whether your timer is paused or running, you will see a Pause or Play icon. Click your mouse to start or pause your timer. Note: A timer continues until it is paused or stopped. Paused billing timers are automatically stopped and removed from the billing timer popup window at midnight local time, and the “fee” billing item is finalized. Any billing timer that is still running past midnight local time will continue running until paused. Billing timers continue to run even if you log out of AppColl.
- To edit a timer, click the Edit icon. This will show the Update Timer window where you can enter desired changes.
- To complete a timer, click on the Checkered Flag icon. This will create a billing item.
- To delete a timer and its associated billing item, click the Trashcan (Delete) icon.

Manage Fee Billing Items
- Hover over the Time Manager icon and select Add or Update Billing Item.

- The Add or Update Fee Billing Item window will open. To edit an existing billing item, simply click the Row for the item. This will cause the Update Billing Item window to show where you can make and save changes.
- To save time entering new billing items, click the Copy button to auto-populate the fields below. Edit or update any information and click the Add Billing Item button to create the billing item.
- Delete a billing item by clicking the Trashcan (Delete) icon.
- Filter billing items by entering text in the Search items box. If there is information in the Client, Matter, or Task fields, checkboxes will appear above the list that allow searching for the specified Client, Matter, or Tasks. Simply check the associated boxes to filter. If you have "Fee" type billing item templates defined, you can select one of them by clicking and typing in the search. This will populate the fields below and the Template field. You may have to manually select the client, matter or task if not populated. When searching dates, you can search for items in a year by typing just the 4-digit year, e.g. “2026". To search for a specific month, type the year and the month, e.g. “2026-01”. For a specific day, “2026-01-12”. You can also use the account date format to search for dates, such as “1/12/2026”. If the list is filtered, you may see text like “(27 or 179)” next to the list title. This indicates that the filter has restricted the items shown. Note that only the first 100 items matching the filters will be shown. If more than 100 match, you will see text like “(100+ of 179)” next to the title. The “+” indicates that more items match than are shown.
- Sort billing items by selecting the Column. A dropdown arrow will appear indicating the sort view. Click the column again to change the sort order.

Uninvoiced, Invoiced, Total and Cap Amounts

When updating a timer and a matter or task is specified, several amounts may be shown in the same row. The amounts are shown to help you manage the total billing to-date for matters and tasks, and to show when a cap (if specified) may have been exceeded. Note that this information is not available to users who have permissions that restrict access to only their own billing items.
Uninvoiced: Shows the total of all “Fee” and “Flat Fee” billing items (including those marked “Do not invoice”) accumulated for the matter or task that have not yet been included in an invoice. “Uninvoiced Fee/Flat Fee” billing types will not be included. Clicking on the amount will open the Billing module in a separate tab, showing all billing items that generated this number.
Invoiced: Shows the total of all “Fee” and “Flat Fee” billing items accumulated for the matter or task that have been included in an invoice. Clicking on the amount will open the Billing module in a separate tab showing all billing items that generated this number.
Total: Shows the sum of Uninvoiced and Invoiced items. If this total exceeds the specified cap (if any), it will be red. Clicking on the amount will open the Billing module in a separate tab showing all billing items that generated this number.
Cap: Shows the Fee cap for the matter or task, if any. Clicking on this amount will open either the matter or task details page that specifies this number.
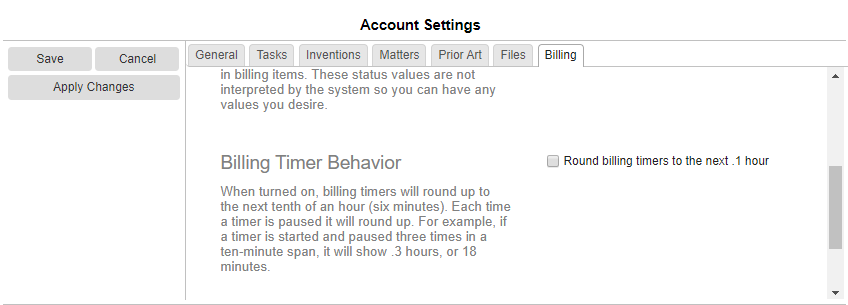
Rounding up Billing Timers
By default, when a billing timer is paused, AppColl will not round the time up to the next 1/10th hour. Instead, when the timer is restarted AppColl will continue exactly where the timer left off. Via the settings page this behavior can be changed to round billing timers up to the next 1/10th hour when they are paused. For example, if a timer is started and paused 3 times in a 10 minute span, the rounded timer will show .3 hours. This feature is disabled by default. Account administrators can enable this feature by going to Settings and selecting the Billing tab. In the Billing Timer Behavior section, check the box as shown below and click on the Save button.