Overview
Restricted Access is a feature in AppColl that restricts the matters that can be viewed by a user. When Restricted Access is enabled for a user, they can only see information related to a specified set of matters.
Things to note about users with Restricted Access:
- They do not have access to the Files module, although they can view files related to a matter by clicking on links in the Matters module.
- They do not see the Reports module as this could expose information not related to their matters. They can however run reports from within a module. Regardless of the report, when the run a report in a module only information related to a user's matters will be displayed.
- They also do not have general access to the contacts module - they can only see their own contact. They can however see important information related to matter contacts from the matter details pages.
Only Account Administrators have the ability to specify the set of matters that are visible to individual users. This is done using the “Restricted Access” menu item under the “Contacts” header.
There are two tabs on the Restricted Access page: Views and View Sets.
To configure Restricted Access for users, first create one or more View Sets that define, using a database query, a set of matters. Second, assign those View Sets to one or more users. Because the same View Set can be applied to multiple users, you can give groups of users access to the same set of matters, which can easily be modified if necessary. Three View Sets may be associated with a user: a Base View Set (which applies to all Restricted Access users), an Include View Set and an Exclude View Set. The matters that a user can see are the combination of all matters in the Base View set and the Include View set, excluding matters in the Exclude View Set.
If no View Sets are assigned to a user and they are enabled for Restricted Access, the default view set is all matters which they are affiliated with. E.g. those matters where that user is an assigned Attorney, Partner, Paralegal, Contributor, Foreign Associate, or they are an employee of the law firm assigned to the matter.
The Views tab displays logins and their Restricted Access configurations. For example, the user Arthur Grey will have access to the matters in the “Not Super Secret” ViewSet plus those in the “Super Secret” ViewSet.

The ViewSets tab shows the configured ViewSets. A ViewSet is a named database query similar to those used in filtering.

Modifying a User’s Permission
Imagine the following scenario:
A new AppColl user named Ben White has been added to the system. He should only have access to the matters for client C20.
Steps to configure this goal:
- Go to Restricted Access Page
- Go to ViewSets tab
- Click “Add View Set”
- Name it “C20 Matters” and set the query to: Client = “C20”
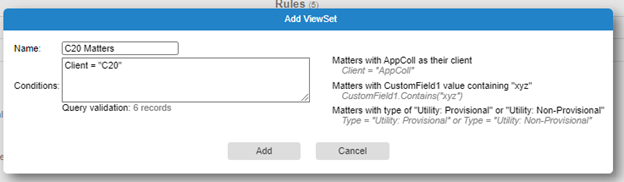
- Click “Add” on the popup
- Go to Views tab
- Click Ben White’s row
- Check the “RestrictedAccess” checkbox
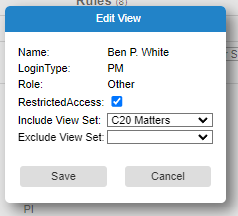
- Select “C20 Matters” in the “Include View Set” field
- Click “Save” on the popup
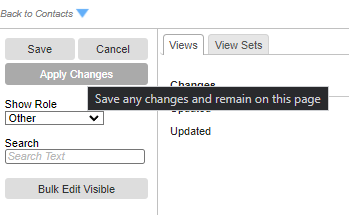
- Click “Apply Changes” to save all modifications to the Restricted Access page
Verifying a User’s Permission
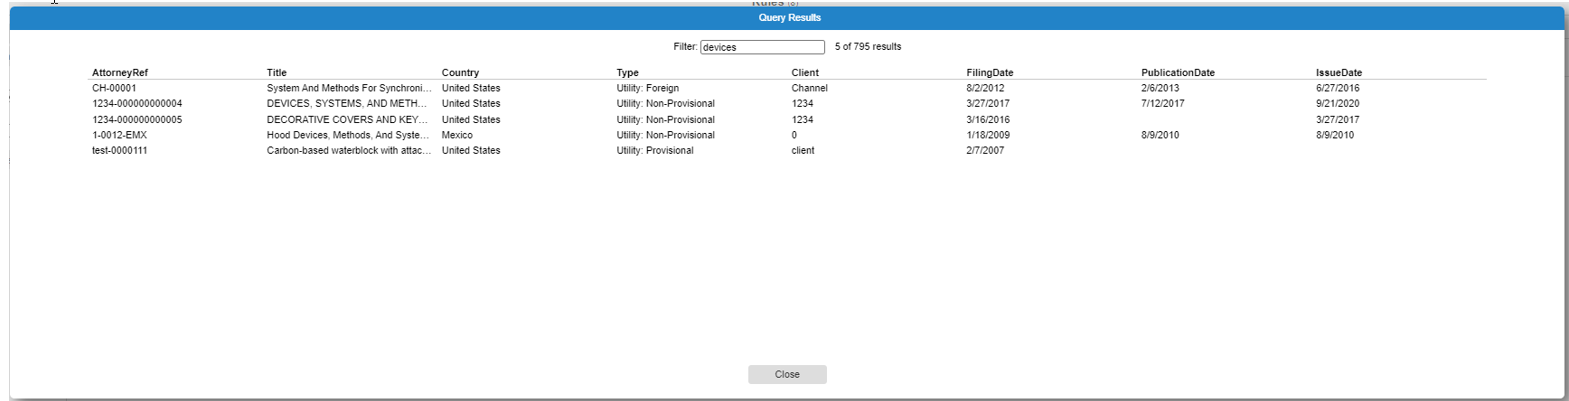
Once a user’s permissions have been modified it can be useful to verify that they can see only the intended matters. To do this, click the “Show” button in the preview column within a contact’s row. These “Show” buttons will only appear for contacts that have Restricted Access enabled. Once you click the “Show” button a popup will appear. Wait for the popup to be populated with a table of matters. You can scroll through the popup or filter for specific text using the textbox at the top.
Bulk Modifying Permissions
Imagine the following scenario:
I need to remove access to client C20’s matters from all contacts with the role of “Other”.
This could be done one at a time but it is easier to do this operation in bulk by following these steps:
- Go to Restricted Access page
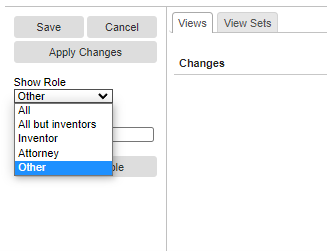
- On Views tab filter the table to only contacts with role of “Other”
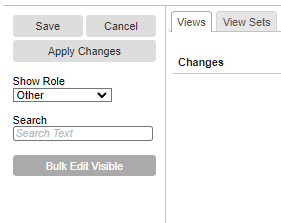
- Click “Bulk Edit Visible” button
- Select “Enable” for “RestrictedAccess”
- Select “C20 Matters” for “Exclude View Set”
- Click Save button (This will affect all rows that are visible in the table)
- Click “Apply Changes” to commit modifications