You can send emails directly from a matter details page, a task details page, an invoice details page or a contact details page. These emails differ from form letters, because the emails can be dynamically sent without having to download an RTF document. A form letter provides a downloadable RTF document to be opened in a word processor, then sent via email by copying and pasting the contents into a message.
The advantage of sending an email directly from a matter, task or contact is by using email templates. You can easily create email templates, which are very similar to task type notification templates. In the upper right corner of any details page is an email icon. Click the icon to open the popup window shown below.
- From within a matter details page, a task details page, an invoice details page or a contact details page, click the Email icon.

- The New Email popup window will open. This popup window provides the option to create a new template from scratch. If you wish to do so, click the Create Template link.

 Tip: Upon clicking Create Template, click the Show Form Fields link in the upper-right corner to expand assistance filling out form fields.

- The new template page is shown below with some example data. Enter the information as needed to fill out the template. For assistance filling in form fields to populate all the Email Fields, click the Show Form Fields link in the upper right corner.
- Populate the Message noting the assistance from the Show Form Fields link in the upper right corner.
- You can also load and edit existing templates by using the Load Template dropdown menu.
- AppColl allows for email templates to be optionally affiliated with one or more contacts. In other words, you can create email templates for individual clients. Click the Add button to select one or more contacts. If this is selected and saved, moving forward, the Load Template dropdown menu will show templates affiliated with the client/contact first, with unaffiliated templates shown below.
- Click the checkbox for When email is sent, create a task for the matter called ‘Emailed Sent’, copy email body into task comments and link all attached documents to task if you wish to create this task. If checked, emails sent via this template will generate a task for the matter indicating an email was sent. The contents of the email will be included in the task comments. Additionally, any documents sent with the email will be attached to the task.
- Save a newly created template by clicking the Save As button, or save a loaded template by clicking the Save button.

- To create an email from a template, select the template from the Select Template dropdown.
- There are also options to use your default email client (i.e., Outlook, Google Mail, Apple Mail, etc.) or use AppColl's internal email form. The advantages and disadvantages of each emailing option are further explained below.
- Click the Email button.

- Make any desired changes directly in the AppColl email page and click Send.

Use Local Email Client: This option opens the email template in your default mail client such as Outlook, Apple Mail, Gmail, etc. There are some limitations with using a local client. First, an "Email Sent" task will not be added into AppColl. Second, any documents attached to the email will not appear in AppColl. Further, the email being passed to the email client cannot exceed 2000 characters. This limit includes any characters in the email including blank spaces, email addresses and the email subject and body. Unfortunately, this is a browser technology limit and we are unable change this. Lastly, html formatting of the text cannot be passed to your mail client such as bold, colored fonts, etc.
Use AppColl for emails: Using AppColl to send the email does not have any of the limitations that local email clients have. See below for a screenshot of AppColl's email interface using the identical template shown above. Notice all of the form fields have been populated. Because this template is associated with a specific task (i.e., File Sections 8 & 9 Declaration), the task and matter details are shown on the left. There's also an Add Attachment button for attaching documents to the email.
Where are Templates stored?
Email templates are stored in the Files module at the top level Email Templates folder. Select this option to work with saved templates.

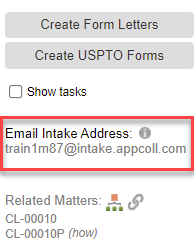
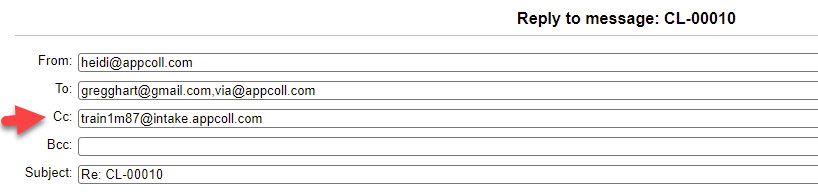
Include the Intake Email
AppColl provides a mechanism by which users can send/forward emails into AppColl. AppColl converts the email to a .eml file and stores it in the appropriate location based on the email address. Specifically, emails can be stored directly to a matter folder, client folder, or a root email folder. When sending an email to a specific matter or client, an "email" sub-folder is created for the matter or client. If you include the intake address in the CC or BCC field, it will auto save to the Conversations tab.
In other words, including the intake address found on the left-hand side of the matter details page places the correspondence into the email folder for that matter and also shows in the Conversations tab.
See more here.