You can add custom fields in the matters module - up to 16 string fields and 4 date fields - to store information associated with a matter that is unique to your account. These custom fields appear in matter detail pages around the middle of the page. When setup, these fields have identical functionality to the built-in fields. They can be added as columns to the main matters page and used in filters. They can also be imported and exported via CSV spreadsheets.
Custom string fields can be created in 3 different forms:
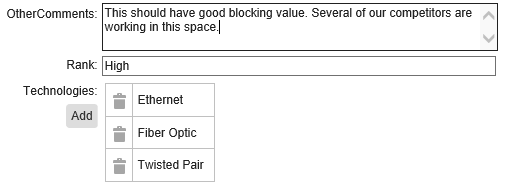
Text Box: You enter free form text in a box 1 to 20 lines high (e.g. OtherComments).
Drop Down: A value is picked from a predefined list of values. Entering text in the box searches the list of values (e.g. Rank).
Multi-Select: One or more items can be selected from a list of values. (e.g. Technologies). New items are added by clicking on the Add button below the field name. Values are removed by clicking on the trash can next to the value.
Set Up
Below are the steps to create or update custom matter fields. Note: Only account admins have this functionality.
- Begin by clicking the Settings icon.
- Select the Settings menu option.

- Select the Matters tab.

- Enter a name for the field you wish to add in the in the Name box. Important: Do not start the custom field with a number.
- Select the Type field from the options.
- Select the configuration of the field. For text boxes, specify the number of lines. For the dropdown and multi-select types, the possible values must be specified by clicking on the Edit Values button which shows a values pop-up.

- You can enter values as a typed list, a contacts query (which will show names from the contacts module) or a matters query (which will show attorney refs from the matters module). Select the appropriate type from the dropdown.
- For a List, just enter the values, one per line, in the box. For the queries, you can enter a Database Query type filter to restrict the values shown in the dropdown or multi-select. For example, in a dropdown you could only show Inventor role contacts by specifying Role = "Inventor". The number of items that match the query will be show below the box. If there is a problem with the syntax of the query you will see an error message rather than the number of matching contacts. The syntax for database queries is described here. If the name is more than one word, do not use a space between the words and start each word with an upper case letter. For example, the name, "Business Units" should be entered as "BusinessUnits".
- Click Save.

- (Optional) If you have previously used a field for another purpose you may want to clear the data in this field for all matters. To do this, click the Clear button. We recommend backing up the existing data in the field using the Export CSV link in the main matters page before clearing the data.
- (Optional) Hover next to the left side of the string to adjust the display order of the fields by clicking the blue up/down arrows next to the field name.

- When finished, click the Save button.

The following video contains the steps shown above along with further information: