Applying payments to invoices is a matter of adding Payment-type billing items to the invoice. Payments can be made from retainers or newly collected money (e.g. checks, wire transfers, credit card, etc.)
In order to use retainers to pay an invoice, a retainer billing item must already exist in AppColl and have a positive balance. Click here to learn how to establish a retainer account and here to read more about retainer balances.
There are three ways to apply payments to an invoice.
Creating a Payment Billing Item
- From the main Billing Item table, click the Add button in the left margin.
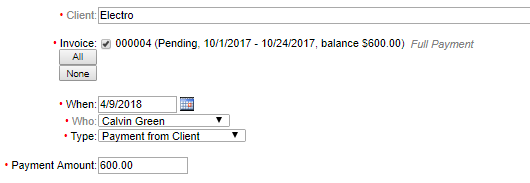
- Select the Client.
- Select "Payment from Client" or "Payment from Retainer" (provided you have at least one retainer with a positive balance).
- Select a payment date in the "When" field.
- Once payment from client or payment from retainer is selected you will see a list of all invoices with outstanding balances.

- Check one or more invoices you wish to pay. AppColl populates the Payment Amount field with the balance due of all selected invoices, but you can change the amount.
- If a "Payment from Retainer" billing item is used, a list of all available retainers for the client are displayed, allowing you to select which one to apply.

- Once the payment is saved, the invoice(s) balance due will reduce by the amount(s) applied. Once the invoice is paid in full, the status changes to 'Paid' and cannot be changed unless one or more payments are removed from the invoice.
Payment from Invoices Summary Screen
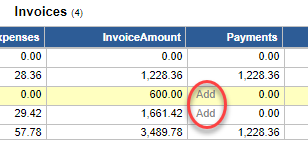
Payments can also be applied from the invoice summary screen. Simply click the 'Add' link next to the desire payment column. A new billing item will open with the client and invoice pre-selected. Choose the desired payment type and amounts and click save.

Payment Directly from Invoice
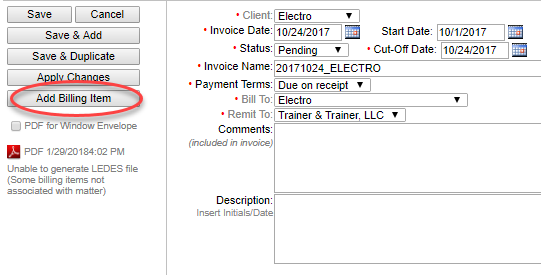
You can add payments to an invoice by opening the invoice itself and clicking the "Add Billing Item" button. The New Billing Item screen opens allowing you to create a billing item of any type. Follow the same steps discussed above.
